Booting a HP ML310e Server with a broken fan that refuses to boot
I recently got a HP ML310e Server machine that refused to boot with a “Fan 2 error, not sufficient”.
However the temperatures were normal and the fan was spinning at max level.
Now in such a case, the system refuses to even enter BIOS and shuts down immediately during POST. Unfortunately, on this machien the iLO was also disabled and there was no way to enable the iLO without booting the system to a point where the iLO can be configured.
Resetting via Dip switch 6 als odidn’t help in this case, as system always shut down before BIOS boot prompt.
So I read about the fan pinout which can be seen here:
1 VCC, 2 N/C, 3 Speed Control, 4 Rotation detect, 5 GND loop, 6 GND
The cable layout also confirmed this wiring:
4.1.6 Fan Connector Pinout and Wiring Colors
Table 1 Connector Pinout
Pin Function Wire Color
1 GND Black
2 12 V Yellow
3 Sense Green
4 Control Blue
Some posts stated, that shorting pins 4-6 would trick the server into booting which would make sense. But what to do about the non-standard connector? I didn’t want to cut the existing fan, just get the system to boot and I didn’t have a matching connector?
I decided to just use a metal paper clip, as it fits perfectly into the connector to short the pins:
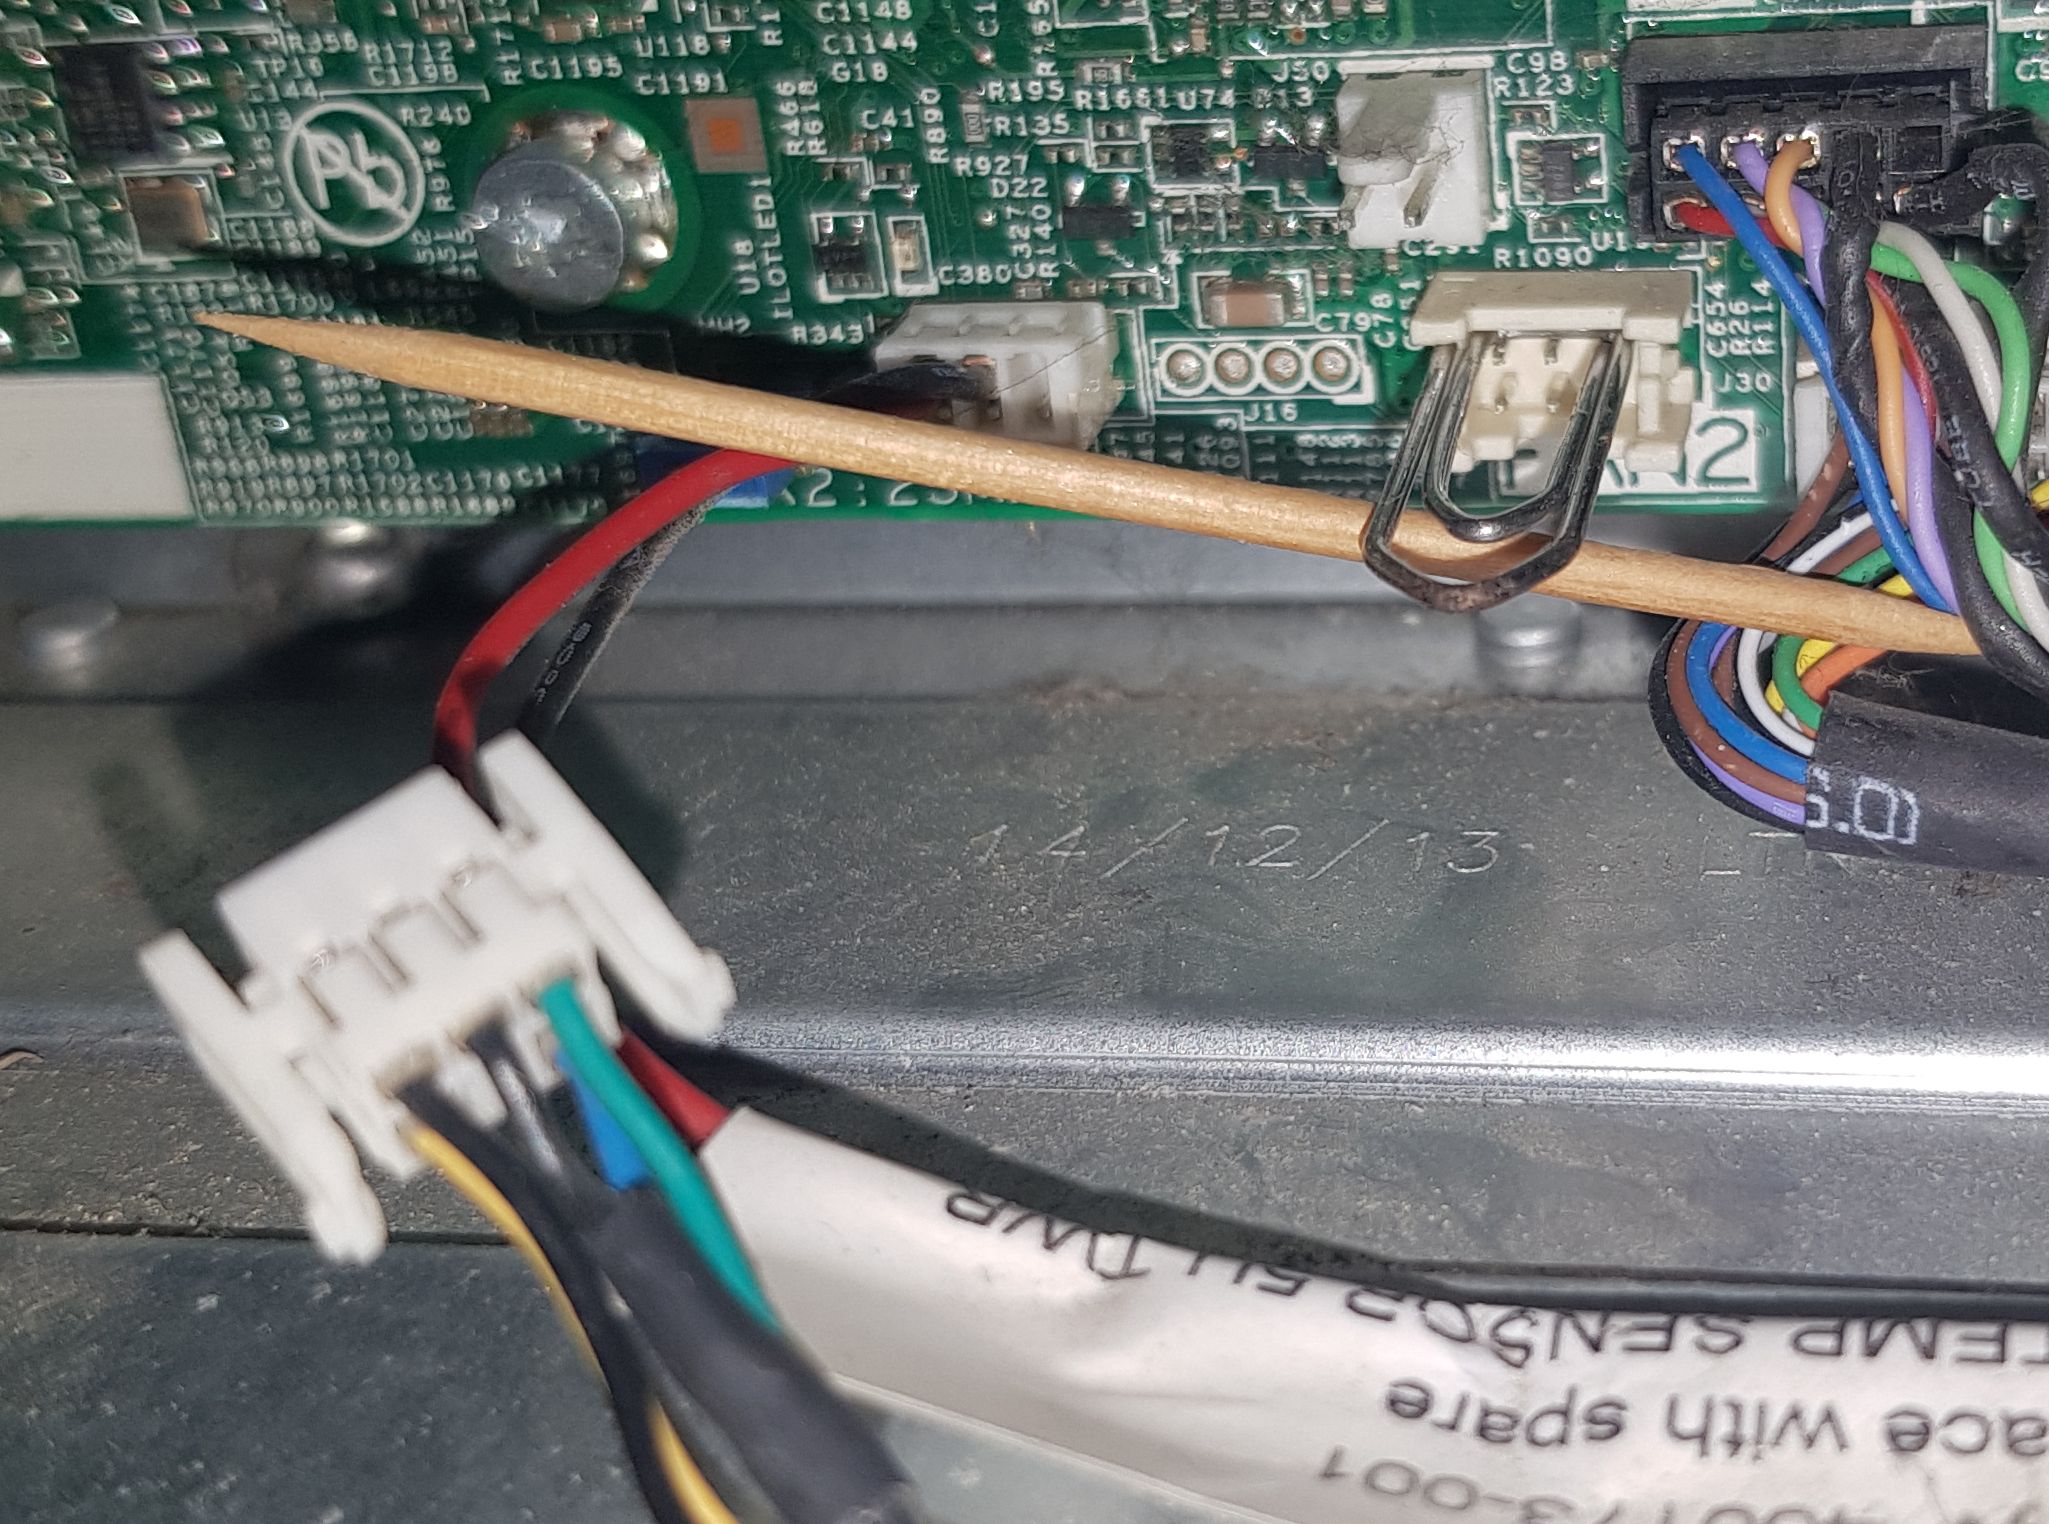
I used a toothpick to stabilize the paper clip to have enough pressure on the pins and tadaaa: The server booted successfully and I was able to enable the iLO console!
Repairing a damaged Windows NT4 registry hive
I was shown a defective HKEY_LOCAL_MACHINE\System registry hive of a Windows NT 4.0 system today (resides in \WINNT\SYSTEM32\CONFIG\SYSTEM ). In order to get NT4 running again, it had to be repaired.
No need to reinstall NT4. In order to repair it, I did the following:
1) Loading the SYSTEM file in Windows XP Regedt32 via File/Load Hive (“Datei/Struktur laden…”). It told me that it was damaged and reparied some damaged pwars before plugging it in.
2) Exporting the hive to a new file via File/Export… (Datei/Exportieren…) by using the Save as type: Registry Hive Files (*.*) (“Registrierungsstrukturdaten (*.*)”) and saving it to a new file
3) Just replacing \WINNT\SYSTEM32\CONFIG\SYSTEM with the newly created hive file.
Worked like a charm, NT4 booted again.
RasPi4 with touch screen as living room media center with TV/Beamer autoswitch
I recently got a RasPi4 with official 7″ touch screen in a case and wanted to
make this my living-room media control center. I attached a video beamer to its
HDMI port (would also work for a TV set) and installed KODI.
My goal was to automatically restart Kodi and execute it on the video projector
screen, as soon as I turn on the device and restart it on the internal touch
screen when the device gets turned off again.
This way I can use the internal touch screen to i.e. listen to Internet Radio
or other live streams using the RasPi conveniently and also use it as a video
entertainment center when turning on the beamer.
This turned out to be not as easy as I initially thought it would be.
First of all, RaspiOS nowadays ships with the KMS/DRM video stack per default.
This is good for hardware accelleration and has a few other advantages, but is
bad for compatibility with the internal 7″ touchscreen display and KODI.
Here are the problems that I encountered:
- Current RaspiOS is based on debian Bullseye and only ships with KODI 19.
However, KODI 19 is missing a feature where its KMS backend can detect
multiple attached Screens (so in my case: Internal DSI-1 display and
external HDMI-1 display). So do most of the specialised Mediacenter
distributions like LibreELEC.
The first version that ships with KODI 20 is based on Debian Bookworm.
So RasPi needs to be updated to Debian Bookworm for KODI 20. - KODI 20 supports the detection of multiple screens (only can use one
of them at the same time, but that’s not a problem for me yet), but
it doesn’t support screen rotation in its KMS backend and doesn’t
obey the console rotation settings. This was a problem in my case, as
the screen got mounted upside-down in the case and due to the way the
case was designed, this also couldn’t be changed physically.
There is very few documentation about the KMS-DRM stack regarding rotation,
so I had to spend a huge amount of time into reading about the workings
of the KMS/DRM graphics stack, as most docuemntation just refers to X,
which isn’t used by KODI on RasPi (and shouldn’t be because of lack
in hardware accelleration). - The libcec library, that also
gets used by KODI internally for i.e. using the remote control of an
attached HDMI-device and other stuff, demands exclusive access to the
CEC interface, therefore I cannot monitor the CEC power status via
another libcec-Based daemon like
libcec-daemon
concurrently. - The FMKS-driver (vc4-fkms-v3d) supports rotation of the screen via
firmware, but doesn’t seem to detect HDMI properly (with attached
device in standby) and also doesn’t offer
CEC kernel support.
Therefore it is also unusable for my project.
So, how to solve all of these problems?
- Easy, just upgrade the OS to bookworm and we have a working KODI 20.
- Unfortunately, there didn’t seem to be a solution for KODI at the
time of writing. It just doesn’t have a setting for screen rotation
and the KMS-DRM requires the application driving the video screen to
set rotation itself. The Raspi-Docs just know about on how to let X
rotate the screen which isn’t what we need.
Therefore the only solution to this is to recompile kodi with a
hardcoded rotation for the internal DSI-1 port.
I made a little patch for Kodi and recompiled it for Debian bookworm
and documented everything in this
Github-Issue. It also documents on how to rotate the touch screen.
If you have the “brilliant” idea to rotate the screen from another
application by setting the rotation property of the active screen locked
by Kodi, like I did, I must disappoint you: You get “access denied”
in this case, so you have to bite the bullet and recompile kodi.
Altough I already provide a Debian package for it on the linked issue,
you can take the patch from there and recompile Kodi yourself, if you
want.
Approximately, this is something like:apt install build-essential devscripts apt source kodi apt build-dep kodi # Apply patch here export DEB_BUILD_OPTIONS="lang=en-US ccache nocheck" export EMAIL='leecher@dose.0wnz.at' dch -n debuild -us -uc -nc
- As libcec-daemon wasn’t usable for me due to mentioned reasons, I
wrote a little application to monitor the CEC0 port myself for changes
in power status and then execute a shell-script that restarts KODI
on change. The program is available in this github repo.
So in order to make the same installation as I did, here is a step-by-step
guide:
-
- Install RapiOS Bookworm
At the time of writing, Debian Bookworm wasn’t available as ready-made
distribution for the RasPi 4, so I had to install RaspiOS Bullseye and
then upgrade it.
If RaspOS based on Debian Bookworm or later is already available when you are
reading this, just install it with the RasPi Imager and you are good to go.
I selected the following
* Raspberry Pi OS (other)
* Raspberry Pi OS Lite (32-bit)Then, upgrade the newly-installed system(as root):apt update apt upgrade --without-new-pkgs sed -i 's/bullseye/bookworm/g' /etc/apt/sources.list sed -i 's/bullseye/bookworm/g' /etc/apt/sources.list.d/* apt update apt full-upgrade reboot
- Install KODI (as root)
apt install kodi socat2a) If your screen is swapped, install special 180° rotated version of KODI
(as root)wget https://github.com/xbmc/xbmc/files/12452936/kodi-bin_20.0%2Bdfsg-2.1_armhf.zip unzip kodi-bin_20.0+dfsg-2.1_armhf.zip rm kodi-bin_20.0+dfsg-2.1_armhf.zip dpkg -i kodi-bin_20.0+dfsg-2.1_armhf.deb sed -i "s/kodi-bin (<< 2:20.0+dfsg-2.1~), //g" /var/lib/dpkg/status vi /boot/cmdline.txt #add at the end of the first line: video=DSI-1:800x480M,rotate=180 echo 'ACTION=="add|change", KERNEL=="event[0-9]*", ENV{LIBINPUT_CALIBRATION_MATRIX}="-1 0 1 0 -1 1"' >/etc/udev/rules.d/90-libinput-rotate.rules
- Install cec-powmon and necessary scripts (as normal user)
Ensure that you are running as normal user and not as root!cd ~ wget https://github.com/leecher1337/cecpowmon/archive/refs/heads/main.zip unzip main.zip rm main.zip mv cecpowmon-main cecpowmon cd cecpowmon make vi restart_kodi.sh
#!/bin/sh
echo '{"jsonrpc":"2.0","method":"Application.Quit","id":1}' | socat -t 1 - TCP-CONNECT:localhost:9090
chmod 755 restart_kodi.sh
vi start_kodi.sh
#!/bin/sh
# Configure CEC for first use
cec-ctl -d 0 --tv -S

# Wait for HDMI status
while :
do
    STATUS=`cec-ctl --give-device-power-status --to 0`
    echo "$STATUS" | grep "pwr-state" >/dev/null
    if [ $? -eq 0 ]; then
      break
    fi
    sleep 2
done
echo "$STATUS" | grep pwr-state | grep "on".
if [ $? -eq 0 ]; then.
    OUTPUT=HDMI-A-1
    SKIN=skin.estuary
else.
    OUTPUT=DSI-1
    SKIN=skin.estouchy
fi
echo "$OUTPUT$SKIN" >~/.kodi/userdata/advancedsettings.xml
/usr/bin/kodi --standalone
chmod 755 start_kodi.sh
mkdir -p ~/.kodi/userdata/
sudo vi /etc/systemd/system/kodi.service
[Unit]
Description=Kodi Media Center
After=remote-fs.target network-online.target
Wants=network-online.target

[Service]
User=[username]
Type = simple
ExecStart=/home/[username]/cecpowmon/start_kodi.sh
ExecStop=/bin/kill -TERM $MAINPID
TimeoutStopSec=5
Restart=always
RestartSec=2
StartLimitInterval=0
LimitNOFILE=16384
SyslogIdentifier = kodi

# lowering memory fragmentation
# https://linux.die.net/man/3/mallopt
# https://github.com/xbmc/xbmc/pull/11620
  Environment=MALLOC_MMAP_THRESHOLD_=131072

# Workaround for high CPU load with nvidia GFX
  Environment=__GL_YIELD=USLEEP

[Install]
WantedBy= multi-user.target
USER=`whoami` sudo sed -i "s/\[username\]/$USER/g" /etc/systemd/system/kodi.service
sudo vi /etc/systemd/system/cecpowmon.service
[Unit]
Description=HDMI CEC Monitor
After=kodi.service
Requires=multi-user.target
Wants=network-online.target

[Service]
ExecStart=/home/[username]/cecpowmon/cecpowmon /home/[username]/cecpowmon/restart_kodi.sh
ExecStop=/bin/kill -TERM $MAINPID
TimeoutStopSec=5
Restart=always
RestartSec=2
StartLimitInterval=0
LimitNOFILE=16384

[Install]
WantedBy=default.target
USER=`whoami` sudo sed -i "s/\[username\]/$USER/g" /etc/systemd/system/cecpowmon.service
sudo systemctl enable cecpowmon
sudo systemctl enable kodi
sudo systemctl daemon-reload
sudo reboot
- Install RapiOS Bookworm
Now you should be greeted with KODI on one of the screens depending on
which you have turned on.
Advokat mit MS SQL Server als CID-Quelle in FreePBX einbinden
Ich habe bereits in einem frühere Artikel dargelegt, wie man in die FreePBX Telefonanlage eine Called ID Suche für das in Österreich populäre Anwaltskanzleipaket Advokat einbindet.
Damals basierte das Paket noch auf einer MS-Access Datenbank, mitterweile ist überall der MS SQL Server vorgeschrieben.
Das bietet den großen Vorteil, dass man nun nicht mehr wie damals die Liste aller Adressen mühsam händisch durchparsen kann (aufgrund des sehr limitierten SQL-Syntax zur Abfrage von MDB-Datenbanken), sondern die DB direkt schnell inklusive Nummern-Normalisierung abfragen kann.
Dies hat den weiteren Vorteil, dass man Asterisk das Abfrageergebnis nicht mehr zwischenspeichern lassen muss (Caching auf Yes in den CID-Einstellungen der FreePBX), was zu dem unschönen Effekt geführt hat, dass die cidname Records in der astdb im Asterisk immer mit einem Leerwert gespeichert wurden, wenn kein Abfrageergebnis vorhanden war, was wiederum zur Folge hatte, dass ein spätere Eintrag der Nummer in der Advokat-Datenbank nicht mehr dazu führte, dass der Namen richtig aufgelöst wird, sondern dieser immer leer bleibt.
Hier also nun die aktualisierte Anleitung:
Zuerst müssen einmal, wenn noch nicht vorhanden, unixodb und die php-Module dafür installiert werden.
php-odbc wird hier als Meta-Paket angegeben, je nach Debian-Release kann es sein, dass man für die Preepbx ein eigenes Paket mit einer kompatiblen PHP-Version installiert hat, demnach wäre der Modulname dann z.B. php7.4-odbc.
Für die Installation der mssql-tools wird auf die jeweiligen Tutorials zur MS SQL Server Installation in diesem Blog verwiesen.
apt-get install unixodbc php-odbc mssql-toolsDie Advokat-Datenquelle dann dem UnixODBC mitteilen. Es wird davon ausgegangen, dass durch die Installation des MS SQL Servers oder zumindest dessen Client Tools schon ein entsprechender Eintrag in /etc/odbcinst.ini angelegt wurde.
Für den Treibernamen ist also ggf die odbcinst.ini zu konsultieren, sollte der hier angegebene nicht passen.
vi /etc/odbc.ini
[Advokat]
Description = Advokat
Driver = ODBC Driver 17 for SQL Server
Server = localhost
Port = 1433
Database = Advokat_DATEN
Nun benötigen wir noch ein kleines PHP-Script, welches die Nummern
normalisiert, damit diese mit der eingehenden Nummer auf der Telefonanlage
verglichen werden können.
Die Normalisierung der Nummer muss man sich entsprechend der Anlagenparameter
anpassen, da diese wohl je nach Provider in unterschiedlicher Form kommt.
Das Script z.B. in den root der FreePBX-Installation kopieren oder an einen
Ort, wo es das CIDLookup Script finden kann.
Zugangsdaten für den Server entsprechend im script anpassen:
tel.php:
define('DSN_ADVOKAT', 'Advokat');

function GetName($odbc, $NNr)
{

    if ($result = odbc_exec($odbc, 'select Titel, Vorname, Name1 from Namen Where NNr='.$NNr))
    {
        if (odbc_fetch_row($result))
        {
            $titel = odbc_result($result,1);
            $ret=($titel?$titel.' ':'').odbc_result($result,2).' '.odbc_result($result,3);
        }
        odbc_free_result($result);
    }
    return $ret;
}

$nr = $_REQUEST['nr'];
if (!is_numeric($nr)) exit;
$where = "WHERE phone='$nr'";
if ($nr[0]=='0' && $nr[1]=='0') $where.=" or phone='".substr($nr, 2)."' ";
else if ($nr[0]=='0' && $nr[1]!='0') $where.=" or phone='43".substr($nr, 1)."' ";

$found=false;
$odbc = odbc_connect(DSN_ADVOKAT, 'sa', 'superuserpassword');
if ($result = odbc_exec($odbc, "with t as (select NNr, REPLACE(REPLACE(REPLACE(REPLACE(REPLACE(REPLACE(CONCAT(Vorwahl, Telefon),' ',''),'(',''),')',''),'-',''),'?',''),'+','') phone from Telefon Where Art='Telefon' or Art='Handy') select NNr, phone from t $where"))
{
    while (odbc_fetch_row($result))
    {
        echo GetName($odbc, odbc_result($result,1));
        $found=true;
        break;
    }
    odbc_free_result($result);
} else echo "fail odbc";

odbc_close($odbc);
Wenn man möchte, kann man auch noch einen Lookup in der lokalen SOGO-Installation anhängen, wenn man einen derartigen Server betreibt und die Views aus dem zugehörigen Artikel angelegt hat (DB User und Passwort enstprechend anpassen):
if (!$found)
{
    // Alternativ kann man noch im SOGO-Adressbuch nachschaun
    if ($conn=mysqli_connect("localhost","sogo","sogopasswd"))
    {
    if ($seldb=mysqli_select_db($conn, "sogo"))
    {
        if ($retrive=mysqli_query($conn, "select c_cn from phoneno_f $where"))
        {
            if($r=mysqli_fetch_row($retrive))
            {
                echo $r[0];
            }
        }
    }
    mysqli_close($conn);
    }
}
Danach müssen wir nur noch eine neue Quelle im CIDLookup definieren.
Source type: HTTP
Host: localhost
Port: 80 oder wo immer der Webserver läuft
Path: /tel.php
Query: nr=[NUMBER]
Cachen nicht aktivieren. Das sollte es gewesen sein.
Installing MS SQL Server 2019 on Devuan Daedalus (~Debian 12/bookworm)
As this systemd plague has also caught Debian, I’m mostly using Devuan for new servers now to have the normal SYSV-Init system I’m used to.
I already wrote an article on how to install MS SQL Server 2017 on Debian Jessie. Now here is a little Tutorial on how to install it on lates Devuan Beowulf:
I assume you are root and fixed the annoying Debian 10 su bug with:
echo "ALWAYS_SET_PATH yes" >/etc/default/su
apt-get install gnupg
wget -qO- https://packages.microsoft.com/keys/microsoft.asc | apt-key add -
wget https://packages.microsoft.com/config/debian/12/packages-microsoft-prod.deb
dpkg -i packages-microsoft-prod.deb
wget -qO- https://packages.microsoft.com/config/ubuntu/20.04/mssql-server-2019.list | tee /etc/apt/sources.list.d/mssql-server.list
wget -qO- https://packages.microsoft.com/config/debian/11/prod.list | tee /etc/apt/sources.list.d/mssql-client.list
apt update
wget http://ftp.uk.debian.org/debian/pool/main/o/openldap/libldap-2.4-2_2.4.57+dfsg-3+deb11u1_amd64.deb
dpkg -i libldap-2.4-2_2.4.57+dfsg-3+deb11u1_amd64.deb
wget http://security.ubuntu.com/ubuntu/pool/main/o/openssl/libssl1.1_1.1.1-1ubuntu2.1~18.04.23_amd64.deb
dpkg -i libssl1.1_1.1.1-1ubuntu2.1~18.04.23_amd64.deb
apt-get install mssql-server
# Ignore error about failed systemctl start after setup
ln -s /usr/lib/x86_64-linux-gnu/libssl.so.1.1 /opt/mssql/lib/libssl.so
vi /etc/init.d/mssql-server
# Insert script from http://hardwarefetish.com/781-ms-sql-server-2017-upstart-script
chmod +x /etc/init.d/mssql-server
update-rc.d mssql-server defaults
/opt/mssql/bin/mssql-conf  setup
/etc/init.d/mssql-server start
apt-get install mssql-tools unixodbc
As can be seen, older libldap and libssl-versions are needed so that it runs.
Removing E (DiskError) flag on system drive of a Synology NAS
Recently, I came across the following problem: A user of a Synology DiskStation wanted upgrade the disk drives to bigger ones. So he tried to do everything correctly:
First, he identified the list of possible disk drives officially supported for his Disk Station and bought the appropriate hard disk.
Then removed one disk drive (drive 2) in the bay and exchanged it with one of the newly bought disks and tols the NAS to repair the volume in order to sync system and data to the new drive.
And here is, where the problems started: The data RAID fortunately synced fine to the second drive, but the System RAID did not sync and left him with a faulty system volume.
This is where I came into play. A quick check via commandline revealed the following status:
sh-4.3# cat /proc/mdstat
Personalities : [linear] [raid0] [raid1] [raid10] [raid6] [raid5]
[raid4]
md2 : active raid1 sda5[2] sdb5[1]
1948779648 blocks super 1.2 [2/2] [UU]

md1 : active raid1 sda2[0] sdb2[1]
2097088 blocks [2/2] [UU]

md0 : active raid1 sdb1[1](E)
2490176 blocks [2/1] [_E]
Now my first thought was: Status E? I’m used to Linux Software RAID, but I never saw such a RAID status code. Checked documentation, no mention if it either. It’s not “F” for faulty, it’s “E”.
After digging around in Google I finally figured out that this is a proprietary status code from Synology RAIDs not implemented in official Linux kernel.
Now how to find out more about it? I found an article on how to reset the “Faulty” flag on an existing array disk, but it didn’t sound very safe given the fact that I didn’t know the original RAID parameters of the RAID.
Now the first thing to do when working with such volumes obviously is to make a copy and work only with the copied drive to have the original drive secured in case something goes wrong. So I dug out another good spare drive of the same size from my collection and copied the existing drive to it sector per sector with dd.
During copying, it turned out there was a bad block (fortunately only one!) on the original drive within the system partition, so that was the reason why the drive’s state went to “E”, which seems to indicate “Disk error”. ddrescue to the rescue! It skipped the bad sector and I had a working copy of the drive to mess around with. I later checked the location of the bad sector and there were sectors with 00s around it, so I guess that there was nothing important on that bad sector anyway.
Now how to reset this damn E flag? First, I needed to identify the Superblock of the RAID volume that went bed. So obviously, just examine it with
mdadm --examine /dev/sdb1
right? BOOM:
mdadm: No md superblock detected on /dev/sdb1.
Where the heck is it? After much googling around, I found a hint, that the Superblock has swapped endianness and was in fact version 0.9 as opposed to the data partition which has a version 1.2 superblock:
# mdadm --examine /dev/sdb1 -e 0
mdadm: No super block found on /dev/sdb1 (Expected magic a92b4efc, got fc4e2ba9)
Now the author of the article changed byte endianness to use the RAID on a PC, but my intention was to just remove the E flag and not mess around with the partition style. By looking at the mdadm source code, I found out that there already was a parameter to obey the different endianness of the superblock, the parameter to be specified is: “-e 0.9”
So I finally was able to dump the superblock of the disk with:
# ./mdadm.synology --examine /dev/sdb1 -e 0.9
/dev/sdb1:
 Magic : a92b4efc
 Version : 0.90.00
 UUID : 5b116fc2:267b242b:3017a5a8:c86610be
 Creation Time : Sat Jan 1 00:00:02 2000
 Raid Level : raid1
 Used Dev Size : 2490176 (2.37 GiB 2.55 GB)
 Array Size : 2490176 (2.37 GiB 2.55 GB)
 Raid Devices : 2
 Total Devices : 1
Preferred Minor : 0

Update Time : Wed Mar 8 16:25:39 2023
 State : clean
 Active Devices : 1
Working Devices : 1
 Failed Devices : 0
 Spare Devices : 0
 Checksum : c15399ef - correct
 Events : 12649239


 Number Major Minor RaidDevice State
this 1 8 17 1 active sync /dev/sdb1

0 0 0 0 0 removed
 1 1 8 17 1 active sync /dev/sdb1
When looking at the output, the array component seemed to be in a perfectly fine condition, no sign of the failure indication from Synology. So I checked the available open source of the Synology Linux kernel for this disk error flag. Turns out that it can be found in md_p.h header file:
#ifdef MY_ABC_HERE
#define MD_DISK_ERROR 6
#endif
Fortunately, Synology marked all their changes to the Stock Linux kernel with the #define MY_ABC_HERE, so specific code paths are easy to spot in the source.
Next, I had to identify the location of the flag in the superblock to confirm my findings. I hexdumped the superblock of the affected device. The 0.90 superblock is of struct mdp_superblock_s, which -according to md_p.h has the following structure:
typedef struct mdp_superblock_s {
 /*
 * Constant generic information
 */
 __u32 md_magic; /* 0 MD identifier */
 __u32 major_version; /* 1 major version to which the set conforms */
 __u32 minor_version; /* 2 minor version ... */
 __u32 patch_version; /* 3 patchlevel version ... */
...
 /*
 * Disks information
 */
 mdp_disk_t disks[MD_SB_DISKS];

/*
 * Reserved
 */
 __u32 reserved[MD_SB_RESERVED_WORDS];

/*
 * Active descriptor
 */
 mdp_disk_t this_disk;

} mdp_super_t;


typedef struct mdp_device_descriptor_s {
 __u32 number; /* 0 Device number in the entire set */
 __u32 major; /* 1 Device major number */
 __u32 minor; /* 2 Device minor number */
 __u32 raid_disk; /* 3 The role of the device in the raid set */
 __u32 state; /* 4 Operational state */
 __u32 reserved[MD_SB_DESCRIPTOR_WORDS - 5];
} mdp_disk_t;
So the state of the individual disks is in the state field of the mdp_disk_t structure. Let’s check the dump and interpret it:
mdp_super_t:
------------
 0000 A9 2B 4E FC 00 00 00 00 00 00 00 5A 00 00 00 00
 0010 00 00 00 00 5B 11 6F C2 38 6D 43 82 00 00 00 01
 0020 00 25 FF 40 00 00 00 01 00 00 00 02 00 00 00 00
 0030 00 00 00 00 26 7B 24 2B 30 17 A5 A8 C8 66 10 BE
 0040 00 00 00 00 00 00 00 00 00 00 00 00 00 00 00 00
 0050 00 00 00 00 00 00 00 00 00 00 00 00 00 00 00 00
 0060 00 00 00 00 00 00 00 00 00 00 00 00 00 00 00 00
 0070 00 00 00 00 00 00 00 00 00 00 00 00 00 00 00 00
 0080 64 08 B7 03 00 00 00 01 00 00 00 01 00 00 00 01
 0090 00 00 00 00 00 00 00 00 C1 53 9A 6F 00 00 00 00
 00A0 00 C1 03 17 00 00 00 00 00 C1 03 17 FF FF FF FF
 00B0 00 00 00 00 00 00 00 00 00 00 00 00 00 00 00 00
 00C0 00 00 00 00 00 00 00 00 00 00 00 00 00 00 00 00
 00D0 00 00 00 00 00 00 00 00 00 00 00 00 00 00 00 00
 00E0 00 00 00 00 00 00 00 00 00 00 00 00 00 00 00 00
 00F0 00 00 00 00 00 00 00 00 00 00 00 00 00 00 00 00
 0100 00 00 00 00 00 00 00 00 00 00 00 00 00 00 00 00
 0110 00 00 00 00 00 00 00 00 00 00 00 00 00 00 00 00
 0120 00 00 00 00 00 00 00 00 00 00 00 00 00 00 00 00
 0130 00 00 00 00 00 00 00 00 00 00 00 00 00 00 00 00
 0140 00 00 00 00 00 00 00 00 00 00 00 00 00 00 00 00
 0150 00 00 00 00 00 00 00 00 00 00 00 00 00 00 00 00
 0160 00 00 00 00 00 00 00 00 00 00 00 00 00 00 00 00
 0170 00 00 00 00 00 00 00 00 00 00 00 00 00 00 00 00
 0180 00 00 00 00 00 00 00 00 00 00 00 00 00 00 00 00
 0190 00 00 00 00 00 00 00 00 00 00 00 00 00 00 00 00
 01A0 00 00 00 00 00 00 00 00 00 00 00 00 00 00 00 00
 01B0 00 00 00 00 00 00 00 00 00 00 00 00 00 00 00 00
 01C0 00 00 00 00 00 00 00 00 00 00 00 00 00 00 00 00
 01D0 00 00 00 00 00 00 00 00 00 00 00 00 00 00 00 00
 01E0 00 00 00 00 00 00 00 00 00 00 00 00 00 00 00 00
 01F0 00 00 00 00 00 00 00 00 00 00 00 00 00 00 00 00
 0200 00 00 00 00 00 00 00 00 00 00 00 00 00 00 00 00
 0210 00 00 00 08 00 00 00 00 00 00 00 00 00 00 00 00
 0220 00 00 00 00 00 00 00 00 00 00 00 00 00 00 00 00
 0230 00 00 00 00 00 00 00 00 00 00 00 00 00 00 00 00
 0240 00 00 00 00 00 00 00 00 00 00 00 00 00 00 00 00
 0250 00 00 00 00 00 00 00 00 00 00 00 00 00 00 00 00
 0260 00 00 00 00 00 00 00 00 00 00 00 00 00 00 00 00
 0270 00 00 00 00 00 00 00 00 00 00 00 00 00 00 00 00

mdp_disk_t disks[MD_SB_DISKS];
 0280 00 00 00 01 00 00 00 08 00 00 00 11 00 00 00 01
 0290 00 00 00 46 00 00 00 00 00 00 00 00 00 00 00 00
 02A0 00 00 00 00 00 00 00 00 00 00 00 00 00 00 00 00
 02B0 00 00 00 00 00 00 00 00 00 00 00 00 00 00 00 00
 02C0 00 00 00 00 00 00 00 00 00 00 00 00 00 00 00 00
 02D0 00 00 00 00 00 00 00 00 00 00 00 00 00 00 00 00
 02E0 00 00 00 00 00 00 00 00 00 00 00 00 00 00 00 00
 02F0 00 00 00 00 00 00 00 00 00 00 00 00 00 00 00 00
 0300 00 00 00 00 00 00 00 00 00 00 00 00 00 00 00 00
 0310 00 00 00 00 00 00 00 00 00 00 00 00 00 00 00 00
 0320 00 00 00 00 00 00 00 00 00 00 00 00 00 00 00 00
 0330 00 00 00 00 00 00 00 00 00 00 00 00 00 00 00 00
 0340 00 00 00 00 00 00 00 00 00 00 00 00 00 00 00 00
 0350 00 00 00 00 00 00 00 00 00 00 00 00 00 00 00 00
 0360 00 00 00 00 00 00 00 00 00 00 00 00 00 00 00 00
 0370 00 00 00 00 00 00 00 00 00 00 00 00 00 00 00 00
 0380 00 00 00 00 00 00 00 00 00 00 00 00 00 00 00 00
 0390 00 00 00 00 00 00 00 00 00 00 00 00 00 00 00 00
 03A0 00 00 00 00 00 00 00 00 00 00 00 00 00 00 00 00
 03B0 00 00 00 00 00 00 00 00 00 00 00 00 00 00 00 00
 03C0 00 00 00 00 00 00 00 00 00 00 00 00 00 00 00 00
 03D0 00 00 00 00 00 00 00 00 00 00 00 00 00 00 00 00
 03E0 00 00 00 00 00 00 00 00 00 00 00 00 00 00 00 00
 03F0 00 00 00 00 00 00 00 00 00 00 00 00 00 00 00 00
 0400 00 00 00 00 00 00 00 00 00 00 00 00 00 00 00 00
 0410 00 00 00 00 00 00 00 00 00 00 00 00 00 00 00 00
 0420 00 00 00 00 00 00 00 00 00 00 00 00 00 00 00 00
 0430 00 00 00 00 00 00 00 00 00 00 00 00 00 00 00 00
 0440 00 00 00 00 00 00 00 00 00 00 00 00 00 00 00 00
 0450 00 00 00 00 00 00 00 00 00 00 00 00 00 00 00 00
 0460 00 00 00 00 00 00 00 00 00 00 00 00 00 00 00 00
 0470 00 00 00 00 00 00 00 00 00 00 00 00 00 00 00 00
 0480 00 00 00 00 00 00 00 00 00 00 00 00 00 00 00 00
 0490 00 00 00 00 00 00 00 00 00 00 00 00 00 00 00 00
 04A0 00 00 00 00 00 00 00 00 00 00 00 00 00 00 00 00
 04B0 00 00 00 00 00 00 00 00 00 00 00 00 00 00 00 00
 04C0 00 00 00 00 00 00 00 00 00 00 00 00 00 00 00 00
 04D0 00 00 00 00 00 00 00 00 00 00 00 00 00 00 00 00
 04E0 00 00 00 00 00 00 00 00 00 00 00 00 00 00 00 00
 04F0 00 00 00 00 00 00 00 00 00 00 00 00 00 00 00 00
 0500 00 00 00 00 00 00 00 00 00 00 00 00 00 00 00 00
 0510 00 00 00 00 00 00 00 00 00 00 00 00 00 00 00 00
 0520 00 00 00 00 00 00 00 00 00 00 00 00 00 00 00 00
 0530 00 00 00 00 00 00 00 00 00 00 00 00 00 00 00 00
 0540 00 00 00 00 00 00 00 00 00 00 00 00 00 00 00 00
 0550 00 00 00 00 00 00 00 00 00 00 00 00 00 00 00 00
 0560 00 00 00 00 00 00 00 00 00 00 00 00 00 00 00 00
 0570 00 00 00 00 00 00 00 00 00 00 00 00 00 00 00 00
 0580 00 00 00 00 00 00 00 00 00 00 00 00 00 00 00 00
 0590 00 00 00 00 00 00 00 00 00 00 00 00 00 00 00 00
 05A0 00 00 00 00 00 00 00 00 00 00 00 00 00 00 00 00
 05B0 00 00 00 00 00 00 00 00 00 00 00 00 00 00 00 00
 05C0 00 00 00 00 00 00 00 00 00 00 00 00 00 00 00 00
 05D0 00 00 00 00 00 00 00 00 00 00 00 00 00 00 00 00
 05E0 00 00 00 00 00 00 00 00 00 00 00 00 00 00 00 00
 05F0 00 00 00 00 00 00 00 00 00 00 00 00 00 00 00 00
 0600 00 00 00 00 00 00 00 00 00 00 00 00 00 00 00 00
 0610 00 00 00 00 00 00 00 00 00 00 00 00 00 00 00 00
 0620 00 00 00 00 00 00 00 00 00 00 00 00 00 00 00 00
 0630 00 00 00 00 00 00 00 00 00 00 00 00 00 00 00 00
 0640 00 00 00 00 00 00 00 00 00 00 00 00 00 00 00 00
 0650 00 00 00 00 00 00 00 00 00 00 00 00 00 00 00 00
 0660 00 00 00 00 00 00 00 00 00 00 00 00 00 00 00 00
 0670 00 00 00 00 00 00 00 00 00 00 00 00 00 00 00 00
 0680 00 00 00 00 00 00 00 00 00 00 00 00 00 00 00 00
 0690 00 00 00 00 00 00 00 00 00 00 00 00 00 00 00 00
 06A0 00 00 00 00 00 00 00 00 00 00 00 00 00 00 00 00
 06B0 00 00 00 00 00 00 00 00 00 00 00 00 00 00 00 00
 06C0 00 00 00 00 00 00 00 00 00 00 00 00 00 00 00 00
 06D0 00 00 00 00 00 00 00 00 00 00 00 00 00 00 00 00
 06E0 00 00 00 00 00 00 00 00 00 00 00 00 00 00 00 00
 06F0 00 00 00 00 00 00 00 00 00 00 00 00 00 00 00 00
 0700 00 00 00 00 00 00 00 00 00 00 00 00 00 00 00 00
 0710 00 00 00 00 00 00 00 00 00 00 00 00 00 00 00 00
 0720 00 00 00 00 00 00 00 00 00 00 00 00 00 00 00 00
 0730 00 00 00 00 00 00 00 00 00 00 00 00 00 00 00 00
 0740 00 00 00 00 00 00 00 00 00 00 00 00 00 00 00 00
 0750 00 00 00 00 00 00 00 00 00 00 00 00 00 00 00 00
 0760 00 00 00 00 00 00 00 00 00 00 00 00 00 00 00 00
 0770 00 00 00 00 00 00 00 00 00 00 00 00 00 00 00 00
 0780 00 00 00 00 00 00 00 00 00 00 00 00 00 00 00 00
 0790 00 00 00 00 00 00 00 00 00 00 00 00 00 00 00 00
 07A0 00 00 00 00 00 00 00 00 00 00 00 00 00 00 00 00
 07B0 00 00 00 00 00 00 00 00 00 00 00 00 00 00 00 00
 07C0 00 00 00 00 00 00 00 00 00 00 00 00 00 00 00 00
 07D0 00 00 00 00 00 00 00 00 00 00 00 00 00 00 00 00
 07E0 00 00 00 00 00 00 00 00 00 00 00 00 00 00 00 00
 07F0 00 00 00 00 00 00 00 00 00 00 00 00 00 00 00 00
 0800 00 00 00 00 00 00 00 00 00 00 00 00 00 00 00 00
 0810 00 00 00 00 00 00 00 00 00 00 00 00 00 00 00 00
 0820 00 00 00 00 00 00 00 00 00 00 00 00 00 00 00 00
 0830 00 00 00 00 00 00 00 00 00 00 00 00 00 00 00 00
 0840 00 00 00 00 00 00 00 00 00 00 00 00 00 00 00 00
 0850 00 00 00 00 00 00 00 00 00 00 00 00 00 00 00 00
 0860 00 00 00 00 00 00 00 00 00 00 00 00 00 00 00 00
 0870 00 00 00 00 00 00 00 00 00 00 00 00 00 00 00 00
 0880 00 00 00 00 00 00 00 00 00 00 00 00 00 00 00 00
 0890 00 00 00 00 00 00 00 00 00 00 00 00 00 00 00 00
 08A0 00 00 00 00 00 00 00 00 00 00 00 00 00 00 00 00
 08B0 00 00 00 00 00 00 00 00 00 00 00 00 00 00 00 00
 08C0 00 00 00 00 00 00 00 00 00 00 00 00 00 00 00 00
 08D0 00 00 00 00 00 00 00 00 00 00 00 00 00 00 00 00
 08E0 00 00 00 00 00 00 00 00 00 00 00 00 00 00 00 00
 08F0 00 00 00 00 00 00 00 00 00 00 00 00 00 00 00 00
 0900 00 00 00 00 00 00 00 00 00 00 00 00 00 00 00 00
 0910 00 00 00 00 00 00 00 00 00 00 00 00 00 00 00 00
 0920 00 00 00 00 00 00 00 00 00 00 00 00 00 00 00 00
 0930 00 00 00 00 00 00 00 00 00 00 00 00 00 00 00 00
 0940 00 00 00 00 00 00 00 00 00 00 00 00 00 00 00 00
 0950 00 00 00 00 00 00 00 00 00 00 00 00 00 00 00 00
 0960 00 00 00 00 00 00 00 00 00 00 00 00 00 00 00 00
 0970 00 00 00 00 00 00 00 00 00 00 00 00 00 00 00 00
 0980 00 00 00 00 00 00 00 00 00 00 00 00 00 00 00 00
 0990 00 00 00 00 00 00 00 00 00 00 00 00 00 00 00 00
 09A0 00 00 00 00 00 00 00 00 00 00 00 00 00 00 00 00
 09B0 00 00 00 00 00 00 00 00 00 00 00 00 00 00 00 00
 09C0 00 00 00 00 00 00 00 00 00 00 00 00 00 00 00 00
 09D0 00 00 00 00 00 00 00 00 00 00 00 00 00 00 00 00
 09E0 00 00 00 00 00 00 00 00 00 00 00 00 00 00 00 00
 09F0 00 00 00 00 00 00 00 00 00 00 00 00 00 00 00 00
 0A00 00 00 00 00 00 00 00 00 00 00 00 00 00 00 00 00
 0A10 00 00 00 00 00 00 00 00 00 00 00 00 00 00 00 00
 0A20 00 00 00 00 00 00 00 00 00 00 00 00 00 00 00 00
 0A30 00 00 00 00 00 00 00 00 00 00 00 00 00 00 00 00
 0A40 00 00 00 00 00 00 00 00 00 00 00 00 00 00 00 00
 0A50 00 00 00 00 00 00 00 00 00 00 00 00 00 00 00 00
 0A60 00 00 00 00 00 00 00 00 00 00 00 00 00 00 00 00
 0A70 00 00 00 00 00 00 00 00 00 00 00 00 00 00 00 00
 0A80 00 00 00 00 00 00 00 00 00 00 00 00 00 00 00 00
 0A90 00 00 00 00 00 00 00 00 00 00 00 00 00 00 00 00
 0AA0 00 00 00 00 00 00 00 00 00 00 00 00 00 00 00 00
 0AB0 00 00 00 00 00 00 00 00 00 00 00 00 00 00 00 00
 0AC0 00 00 00 00 00 00 00 00 00 00 00 00 00 00 00 00
 0AD0 00 00 00 00 00 00 00 00 00 00 00 00 00 00 00 00
 0AE0 00 00 00 00 00 00 00 00 00 00 00 00 00 00 00 00
 0AF0 00 00 00 00 00 00 00 00 00 00 00 00 00 00 00 00
 0B00 00 00 00 00 00 00 00 00 00 00 00 00 00 00 00 00
 0B10 00 00 00 00 00 00 00 00 00 00 00 00 00 00 00 00
 0B20 00 00 00 00 00 00 00 00 00 00 00 00 00 00 00 00
 0B30 00 00 00 00 00 00 00 00 00 00 00 00 00 00 00 00
 0B40 00 00 00 00 00 00 00 00 00 00 00 00 00 00 00 00
 0B50 00 00 00 00 00 00 00 00 00 00 00 00 00 00 00 00
 0B60 00 00 00 00 00 00 00 00 00 00 00 00 00 00 00 00
 0B70 00 00 00 00 00 00 00 00 00 00 00 00 00 00 00 00
 0B80 00 00 00 00 00 00 00 00 00 00 00 00 00 00 00 00
 0B90 00 00 00 00 00 00 00 00 00 00 00 00 00 00 00 00
 0BA0 00 00 00 00 00 00 00 00 00 00 00 00 00 00 00 00
 0BB0 00 00 00 00 00 00 00 00 00 00 00 00 00 00 00 00
 0BC0 00 00 00 00 00 00 00 00 00 00 00 00 00 00 00 00
 0BD0 00 00 00 00 00 00 00 00 00 00 00 00 00 00 00 00
 0BE0 00 00 00 00 00 00 00 00 00 00 00 00 00 00 00 00
 0BF0 00 00 00 00 00 00 00 00 00 00 00 00 00 00 00 00
 0C00 00 00 00 00 00 00 00 00 00 00 00 00 00 00 00 00
 0C10 00 00 00 00 00 00 00 00 00 00 00 00 00 00 00 00
 0C20 00 00 00 00 00 00 00 00 00 00 00 00 00 00 00 00
 0C30 00 00 00 00 00 00 00 00 00 00 00 00 00 00 00 00
 0C40 00 00 00 00 00 00 00 00 00 00 00 00 00 00 00 00
 0C50 00 00 00 00 00 00 00 00 00 00 00 00 00 00 00 00
 0C60 00 00 00 00 00 00 00 00 00 00 00 00 00 00 00 00
 0C70 00 00 00 00 00 00 00 00 00 00 00 00 00 00 00 00
 0C80 00 00 00 00 00 00 00 00 00 00 00 00 00 00 00 00
 0C90 00 00 00 00 00 00 00 00 00 00 00 00 00 00 00 00
 0CA0 00 00 00 00 00 00 00 00 00 00 00 00 00 00 00 00
 0CB0 00 00 00 00 00 00 00 00 00 00 00 00 00 00 00 00
 0CC0 00 00 00 00 00 00 00 00 00 00 00 00 00 00 00 00
 0CD0 00 00 00 00 00 00 00 00 00 00 00 00 00 00 00 00
 0CE0 00 00 00 00 00 00 00 00 00 00 00 00 00 00 00 00
 0CF0 00 00 00 00 00 00 00 00 00 00 00 00 00 00 00 00
 0D00 00 00 00 00 00 00 00 00 00 00 00 00 00 00 00 00
 0D10 00 00 00 00 00 00 00 00 00 00 00 00 00 00 00 00
 0D20 00 00 00 00 00 00 00 00 00 00 00 00 00 00 00 00
 0D30 00 00 00 00 00 00 00 00 00 00 00 00 00 00 00 00
 0D40 00 00 00 00 00 00 00 00 00 00 00 00 00 00 00 00
 0D50 00 00 00 00 00 00 00 00 00 00 00 00 00 00 00 00
 0D60 00 00 00 00 00 00 00 00 00 00 00 00 00 00 00 00
 0D70 00 00 00 00 00 00 00 00 00 00 00 00 00 00 00 00
 0D80 00 00 00 00 00 00 00 00 00 00 00 00 00 00 00 00
 0D90 00 00 00 00 00 00 00 00 00 00 00 00 00 00 00 00
 0DA0 00 00 00 00 00 00 00 00 00 00 00 00 00 00 00 00
 0DB0 00 00 00 00 00 00 00 00 00 00 00 00 00 00 00 00
 0DC0 00 00 00 00 00 00 00 00 00 00 00 00 00 00 00 00
 0DD0 00 00 00 00 00 00 00 00 00 00 00 00 00 00 00 00
 0DE0 00 00 00 00 00 00 00 00 00 00 00 00 00 00 00 00
 0DF0 00 00 00 00 00 00 00 00 00 00 00 00 00 00 00 00
 0E00 00 00 00 00 00 00 00 00 00 00 00 00 00 00 00 00
 0E10 00 00 00 00 00 00 00 00 00 00 00 00 00 00 00 00
 0E20 00 00 00 00 00 00 00 00 00 00 00 00 00 00 00 00
 0E30 00 00 00 00 00 00 00 00 00 00 00 00 00 00 00 00
 0E40 00 00 00 00 00 00 00 00 00 00 00 00 00 00 00 00
 0E50 00 00 00 00 00 00 00 00 00 00 00 00 00 00 00 00
 0E60 00 00 00 00 00 00 00 00 00 00 00 00 00 00 00 00
 0E70 00 00 00 00 00 00 00 00 00 00 00 00 00 00 00 00
 0E80 00 00 00 00 00 00 00 00 00 00 00 00 00 00 00 00
 0E90 00 00 00 00 00 00 00 00 00 00 00 00 00 00 00 00
 0EA0 00 00 00 00 00 00 00 00 00 00 00 00 00 00 00 00
 0EB0 00 00 00 00 00 00 00 00 00 00 00 00 00 00 00 00
 0EC0 00 00 00 00 00 00 00 00 00 00 00 00 00 00 00 00
 0ED0 00 00 00 00 00 00 00 00 00 00 00 00 00 00 00 00
 0EE0 00 00 00 00 00 00 00 00 00 00 00 00 00 00 00 00
 0EF0 00 00 00 00 00 00 00 00 00 00 00 00 00 00 00 00
 0F00 00 00 00 00 00 00 00 00 00 00 00 00 00 00 00 00
 0F10 00 00 00 00 00 00 00 00 00 00 00 00 00 00 00 00
 0F20 00 00 00 00 00 00 00 00 00 00 00 00 00 00 00 00
 0F30 00 00 00 00 00 00 00 00 00 00 00 00 00 00 00 00
 0F40 00 00 00 00 00 00 00 00 00 00 00 00 00 00 00 00
 0F50 00 00 00 00 00 00 00 00 00 00 00 00 00 00 00 00
 0F60 00 00 00 00 00 00 00 00 00 00 00 00 00 00 00 00
 0F70 00 00 00 00 00 00 00 00 00 00 00 00 00 00 00 00

mdp_disk_t this_disk;
 0F80 00 00 00 01 00 00 00 08 00 00 00 11 00 00 00 01
 0F90 00 00 00 46 00 00 00 00 00 00 00 00 00 00 00 00
 0FA0 00 00 00 00 00 00 00 00 00 00 00 00 00 00 00 00
 0FB0 00 00 00 00 00 00 00 00 00 00 00 00 00 00 00 00
 0FC0 00 00 00 00 00 00 00 00 00 00 00 00 00 00 00 00
 0FD0 00 00 00 00 00 00 00 00 00 00 00 00 00 00 00 00
 0FE0 00 00 00 00 00 00 00 00 00 00 00 00 00 00 00 00
 0FF0 00 00 00 00 00 00 00 00 00 00 00 00 00 00 00 00
I marked the significant fields in the dump. It can be seen that the state flag is 0x46 (that is 1000110b) which indicates:
#define MD_DISK_FAULTY 0
#define MD_DISK_ACTIVE 1
#define MD_DISK_SYNC 2
#define MD_DISK_REMOVED 3
#define MD_DISK_CLUSTER_ADD 4
#define MD_DISK_CANDIDATE 5
#define MD_DISK_ERROR 6

#define MD_DISK_WRITEMOSTLY 9
#define MD_DISK_JOURNAL 18
Bingo, there it is, MD_DISK_ERROR! So I was temtped to just remove the flag with a Hex editor, but beware: There is a checksum for the superblock header! So what’s the easiest thing to do?
First, check if Synology’s mdadm fork contained functions to maybe already clear the error flag. There must be a custom implementation, because it is able to display the E flag.
Turns out, there is no such function, so I had to extend the mdadm source code to introduce such a feature.
So, in short, I forked mdadm and implemented it, it can be downlaoded here together with a description on how to use it, so read the README there for a continuation of this story.
In short, I cleared the errorflag of the partition with my patched mdadm:
./mdadm.synology --misc --no-diskerr /dev/sdb1 -e 0.9
and put the disk back in the Synology, booted up, repaired system partition and got back a running system without having to reinstall the Synology DSM Software and its settings.
Installing BoundsChecker 8 on Windows 7 x64
I had real pain installing DevParther Studio Professional Edition
for its BoundsChecker 8 component under Windows 7 64 bit.
MSI installations fortunately can be debugged with
msiexec /i "Compuware DevPartner Studio Professional Edition.msi" /lvx log2.txt
Searching for ‘1603’ in log file helps finding the error location.
First of all, after installing the .NET Framework 1.1, it refues
to isntall saying that Boundchecker was already installed, which was
not true.
Turns out, that it checks for
HKEY_LOCAL_MACHINE\SOFTWARE\Wow6432Node\NuMega\BoundsChecker
key, which has been set during .NET Framework installation to
mark that it had been installed.
But that in turn makes further setup atempts impossible.
So first problem was resolved by deleting above mentioned key.
Next, it went further, but rolled back during writing registry keys.
According to the log, it had problems overwriting a CLSID key
of MSXML3 parser:
MSI (s) (54!A8) [20:17:50:008]: Creating MSIHANDLE (12522) of type 790531 for thread 2984

Finding the key CLSID\{2933BF90-7B36-11d2-B20E-00C04F983E60}\SideBySide; the result is: 5

MSI (s) (54!A8) [20:17:50:009]: Closing MSIHANDLE (12522) of type 790531 for thread 2984

MSI (s) (54!A8) [20:17:50:009]: Creating MSIHANDLE (12523) of type 790531 for thread 2984

AddRefcountMsxml returns the code 5
So,next, I had to change the owner of the following Registry key
(which is owned by TrustedInstaller) to Administrators group and then
allow full access to everyone for this key:
HKEY_CLASSES_ROOT\Wow6432Node\CLSID\{2933BF90-7B36-11D2-B20E-00C04F983E60}
Next, it went a bit further but stopped at:
MSI (s) (54!50) [20:48:20:465]: Creating MSIHANDLE (15175) of type 790531 for thread 4176

PerformTypeLib Name: 'msxml3.dll' LibDir: 'C:\Windows\SysWOW64\' HelpDir: 'C:\Windows\SysWOW64\'

MSI (s) (54!50) [20:48:20:466]: Closing MSIHANDLE (15175) of type 790531 for thread 4176

MSI (s) (54!50) [20:48:20:468]: Creating MSIHANDLE (15176) of type 790531 for thread 4176

PerformTypeLib failed with error code 11 and function code 0x8002801C.
Error code 0x8002801C is TYPE_E_REGISTRYACCESS
Fired up Process Monitor and checked where there is access denied
for msiexec.exe furing installation. Turned out to be:
MsiExec.exe 2588 RegCreateKey HKCR\TypeLib\{F5078F18-C551-11D3-89B9-0000F81FE221}\3.0\HELPDIR ACCESS DENIED Desired Access: Maximum Allowed
So I did the same Permission adjustment for the key
HKCR\TypeLib\{F5078F18-C551-11D3-89B9-0000F81FE221}\3.0
in the registry so allo everyone to access it.
Finally, installation finished properly. However I wasn’t very happy with it on Win 7 anyway, as the dpinject64.sys driver that gets installes crashes the system and makes it stuck. Maybe it can be fixed, but I then gave up on it. Seems that a new version is needed.
Installing Collabora Office on Devuan Beowulf
Unfortunately, the Package coolwsd from Collabora for Debian 10 relies on systemd. And most recent loolwsd is now coolwsd for Collabora online (office suite to use with nextcloud).
So here is a short how-to how to set it up on Devuan Beowulf:
Setup repo:
apt install gnupg apt-key adv --keyserver keyserver.ubuntu.com --recv-keys 0C54D189F4BA284D

echo "deb https://www.collaboraoffice.com/repos/CollaboraOnline/CODE-debian10 ./" >/etc/apt/sources.list.d/collabora.list

apt update
Install cooldwsd without systemd:
apt-get download coolwsd code-brand

dpkg -i --ignore-depends=systemd coolwsd_22.05.7.2-1_amd64.deb
I actually did it this way, as I was unaware of –ignore-depends option, but I leave it in here for reference in case it doesn’t work with ignore-depends option:
dpkg --force-all -i coolwsd_22.05.7.2-1_amd64.deb
Then remove systemd dependency to fix package cache:
vi /var/lib/dpkg/status
Remove “systemd” from “coolwsd” package in dependency list so that your apt isn’t damaged anymore.
When you installed with –force-all, install missing dependencies:
apt install expat collaboraofficebasis-calc collaboraofficebasis-core collaboraofficebasis-graphicfilter collaboraofficebasis-images collaboraofficebasis-impress collaboraofficebasis-ooofonts collaboraofficebasis-writer collaboraoffice collaboraoffice-ure collaboraofficebasis-en-us collaboraofficebasis-draw collaboraofficebasis-extension-pdf-import collaboraofficebasis-ooolinguistic collaboraofficebasis-math code-brand
Create logfile dir:
mkdir /var/log/coolwsd

chown cool:cool /var/log/coolwsd
Configure coolwsd:
vi /etc/coolwsd/coolwsd.xml

ssl/enable -> false

ssl/termination -> true

net/listen -> loopback

file -> enable=true

file/patch -> /var/log/coolwsd/coolwsd.log

trace_event/path -> /var/log/coolwsd/coolwsd.trace.json

net/proto -> IPv4

storage/ssl/as_scheme -> false

net/

<host desc="External IP of server">123\.123\.123\.123</host>
Create init.d script /etc/init.d/coolwsd
#!/bin/sh
### BEGIN INIT INFO
# Provides:          coolwsd
# Required-Start:    $local_fs $remote_fs $network $syslog $named
# Required-Stop:     $local_fs $remote_fs $network $syslog $named
# Default-Start:     2 3 4 5
# Default-Stop:      0 1 6
# Short-Description: libreoffice
# Description:       LibreOffice Online WebSocket server
#                    This script will start the libreoffice server
### END INIT INFO

# run update-rc.d for create K S file in /etc/init.d/*


DESC="LibreOffice Online WebSocket server"
NAME=coolwsd
USER=cool
DAEMON=/usr/bin/$NAME
PIDFILE=/var/run/$NAME.pid
PARAM=""
PARAM="$PARAM --version"
PARAM="$PARAM --disable-ssl"
PARAM="$PARAM --o:sys_template_path=/opt/cool/systemplate"
PARAM="$PARAM --o:child_root_path=/opt/cool/child-roots"
PARAM="$PARAM --o:file_server_root_path=/usr/share/coolwsd"
PARAM="$PARAM --o:logging.file[@enable]=true"

test -x $DAEMON || exit 0


. /lib/lsb/init-functions


if [ "$(id -u)" != "0" ]
then
  log_failure_msg "You must be root to start, stop or restart cool"
  exit 1
fi


do_status () {
     log_daemon_msg "$DESC" "$name"
     start-stop-daemon --status --verbose --pidfile $PIDFILE
     log_end_msg $?
     return $?
}

do_start () {
  log_daemon_msg "Starting $DESC" "$name"
  start-stop-daemon --start --verbose --pidfile $PIDFILE --make-pidfile --chuid $USER --background --exec $DAEMON -- $PARAM
  log_end_msg $?
  return $?
}

do_stop () {
  log_daemon_msg "Stopping $DESC" "$name"
  start-stop-daemon --stop --verbose --pidfile $PIDFILE --remove-pidfile
  log_end_msg $?
  return $?
}

case "$1" in
  status)
     do_status || exit 1
     ;;
  start)
     do_start || exit 1
     ;;
  stop)
     do_stop || exit 1
     ;;
  force-reload|restart)
     do_stop && sleep 3
     do_start || exit 1
     ;;
  *)

     echo "Usage: /etc/init.d/lool {start|stop|restart|force-reload|status}"
     exit 1
esac

exit 0
Install with: update-rc.d coolwsd defaults
Now setup apache virtualhost to collabora.yourdomain.com:
cp /etc/apache2/sites-available/000-default.conf /etc/apache2/sites-available/collabora.conf

vi /etc/apache2/sites-available/collabora.conf
Uncomment & set the ServerName directive.
Install SSL certificate:
a2ensite collabora

/etc/init.d/apache2 reload

certbot --apache -d collabora.yourdomain.com

a2enmod proxy proxy_wstunnel proxy_http
Add configuration options for coolwsd:
vi /etc/apache2/sites-enabled/collabora-le-ssl.conf:
# Encoded slashes need to be allowed
AllowEncodedSlashes NoDecode

# Container uses a unique non-signed certificate
SSLProxyEngine Off
SSLProxyVerify None
SSLProxyCheckPeerCN Off
SSLProxyCheckPeerName Off

# keep the host
ProxyPreserveHost On

# static html, js, images, etc. served from coolwsd
# browser is the client part of LibreOffice Online
ProxyPass /browser http://127.0.0.1:9980/browser retry=0
ProxyPassReverse /browser http://127.0.0.1:9980/browser

# WOPI discovery URL
ProxyPass /hosting/discovery http://127.0.0.1:9980/hosting/discovery retry=0
ProxyPassReverse /hosting/discovery http://127.0.0.1:9980/hosting/discovery

# Main websocket
ProxyPassMatch "/cool/(.*)/ws$" ws://127.0.0.1:9980/cool/$1/ws nocanon

# Admin Console websocket
ProxyPass /cool/adminws ws://127.0.0.1:9980/cool/adminws

# Download as, Fullscreen presentation and Image upload operations
ProxyPass /cool http://127.0.0.1:9980/cool
ProxyPassReverse /cool http://127.0.0.1:9980/cool

# Endpoint with information about availability of various features
ProxyPass /hosting/capabilities http://127.0.0.1:9980/hosting/capabilities retry=0
ProxyPassReverse /hosting/capabilities http://127.0.0.1:9980/hosting/capabilities
Start collabora and reload apache and it should work:
/etc/init.d/apache2 reload

/etc/init.d/coolwsd start
Hope that helps to use collabora without this dreaded systemd cr*p.
Fixing a bug in Zarafa Client 7.2.4 that crashed it on Outlook >2013
A customer is running a Zarafa Server for some years now and it works nicely with its webinterface and all integrations. He also used the Zarafa Client (zarafaclient-7.2.4-52167.msi) on Outlook 2010 without issues, but only on 2 machines.
But as the number of users grew, it was desirable to get it running an new machines and unfortunately, Microsoft doesn’t sell licenses for old Outlook versions anymore. I tried running the Zarafa Client on Outlook 2022, but after installation, Outlook just crashed after the Splash screen.
So time to look into the internals of the Zarafa connector.
It seems to use an old “trick” to hook Outlook by placing a version.dll in Outlook’s program directory so that due to the DLL search path, the “prepared” version.dll gets loaded, which forwards the normal functions to the system’s version.dll but is hooking 2 functions on startup:
MAPILogonEx in olmapi32.dll and GetProcAddress in kernel32.dll to filter dynamically loaded functions.
GetProcAddress checks for the import or Ordinal 11 in olmapit32.dll, which also is MAPILogonEx and hooks it and it also hooks functions FValidEmsabpEntryID and FValidEmsabpEntryIDBin.
Interesting for the problem is the MAPLogonEx hook. In there, it checks current Outlook version from HKEY_CLASSES_ROOT\Outlook.Application\CurVer key and compares it to the value 15, because the “IMAPISession” class that it tries to overload changed in version 15.
And here is the problem. It does (in pseudocode):
if (!SUCCEEDED(GetOutlookVersion(&dwVersion)) || dwVersion != 15)
{
  *lppSession = &IMAPISessionWrapper;
}
else
{
  *lppSession = &IMAPISessionOlk15Wrapper;
}
Now Outlook 2022 is Version 16, (for a list of Outlook version numbers, see Wikipedia article on Outlook), therefore it falls back to Version 14 and below vtable and then the wrapper functions call the wrong functions and so – besides wrong function calls – we end up with a ruined stack that finally crashes Outlook.
The fix is incredibly simple: Change dwVersion != 15 to dwVersion < 15, so in ASM:
.text:100038BA                 cmp     [esp+8+arg_10], 0Fh
.text:100038BF                 jnz     short loc_100038E3
So change jnz to jb. And tadaa… It works! (with a Hex-Editor, you can change 75h to 72h on offset 2CBFh).
I made a little Patcher that does the work for you, if you are experiencing the same problem.
For me, this simple fix was enough to get it running.
Testing file system repair attempts on a read-only disk image
I recently got a damaged HFS+ formatted volume for analysis and repair.
Now I did what has to be done first on all data recovery attempts, obviously: Create a dd Disk image from the disk before messing around with it.
As the volume was very large, it would cost a lot of time and disk space to always make a copy of the image, mess around with it and if it fails, restore the original image. Copying around terabytes of data on a slow medium like classic harddisks is taking a lot of time, after all.
So I was searching for a way to operate on a snapshot-overlay of the original image to mess around with it and just dump the snapshot and revert, if something goes wrong.
Fortunately, I found this Stackoverflow post, which describes a way to do what I want.
So here is a little mount script mount_ovl.sh:
#!/bin/sh
if [ $# -eq 0 ]; then
  echo Usage: $0 ro-device \[overlay-size\]
  echo i.e.: $0 /dev/loop0
  exit
fi
if [ ! -e $1 ]; then
  echo $1 does not exist
  exit
fi
if [ -z "$2" ]; then
  ovlsz=10G
else
  ovlsz=$2
fi

ovl=/tmp/ovl
newdevname=ovldev
truncate -s$ovlsz $ovl
size=$(blockdev --getsz "$1")
loop=$(losetup -f --show -- "$ovl")
echo "0 $size snapshot $1 $loop P 8" | dmsetup create "$newdevname"
echo Mounted $loop to $newdevname
So, to i.e. do a fsck.hfsplus without ruining the original image, I first create a loopf device of the disk image:
# losetup -P /dev/loop0 /mnt/winhexraw.dd
Let’s list the partitions that it autodetected with -P:
# fdisk -lu /dev/loop0
Disk /dev/loop0: 931,5 GiB, 1000170586112 bytes, 1953458176 sectors
Units: sectors of 1 * 512 = 512 bytes
Sector size (logical/physical): 512 bytes / 512 bytes
I/O size (minimum/optimal): 512 bytes / 512 bytes
Disklabel type: gpt
Disk identifier: B9D171AA-7F12-4DD2-B1BD-FAE6A14B1DA8

Device        Start        End    Sectors   Size Type
/dev/loop0p1     40     409639     409600   200M EFI System
/dev/loop0p2 409640 1953195991 1952786352 931,2G Apple HFS/HFS+
So /dev/loop0p2 is the partition that needs to be checked.
Now mount it R/W with the script to /dev/mapper/ovldev:
./mount_ovl.sh /dev/loop0p2
Now it can be i.e. checked with
fsck.hfsplus -f /dev/mapper/ovldev
and possibly fixed. In my case, file system was damaged and fsck was unable to fix it, so I finally resorted to HFS+ rescue to get the files off from it. But this little hint can still be useful for futher attempts to i.e. repair the filesystem by hand.
To drop the snapshot again, assuming that it got mounted to /dev/loop1:
dmsetup remove "ovldev"
losetup -d /dev/loop1
And to release original loop device for disk image:
losetup -d /dev/loop0
Might become handy some day.
 System programmer